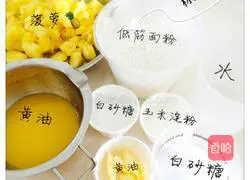
Ingredients
Low-gluten flour (for pie dough) ( 150g ) | Butter (for pie crust) ( 60g ) |
| Caster sugar (for pie crust) ( 15g ) | Water (for pie dough) ( 50g ) |
Butter ( (for stuffing) ( 10g ) | Corn starch (for stuffing) ( 10g ) |
Lemon juice (for stuffing) ( Appropriate amount ) | Salt (for stuffing) ( Adequate amount ) |
Fine sugar (for stuffing) ( 40g ) | Water (for stuffing) ( 20g ) | Pineapple (for stuffing) ( 300g ) | Whole egg liquid (for brushing the skin) ( one ) |
How to make mini pineapple pies
1.Weighed all the materials.I didn’t finish taking photos of the materials.

2.After melting 60g butter in water, add low-gluten flour, then add 15g fine sugar and 50g water, stir evenly, knead into a dough, wrap it in plastic wrap and put it in the refrigerator to rest for a while.While it's chilling, we'll make the pie filling.
3. Remove the skin from the pineapple and chop it into cubes.Melt 10g of butter in a non-stick pan, then add the diced pineapple pulp.Add cornstarch, salt, lemon juice, 40g of fine sugar and 20g of water and stir-fry., stir-fry until the pineapple meat becomes soft, the water is almost reduced, and the filling becomes thick, take it out of the pan and pour it into a basin and set aside.
4. Take out the dough that has been refrigerated for a while and divide it into 6 parts, and then divide each part into two parts at a ratio of 2:1.
5.Use a rolling pin to roll into thin slices with a ratio of 2, put it into the egg tart mold, adjust and lightly press the dough with your hands to make the dough stick to the mold, remove the excess dough and set it aside for later use., use a toothpick to poke some small holes in the bottom of the dough.
6. Scoop the cooled pineapple filling into the pie
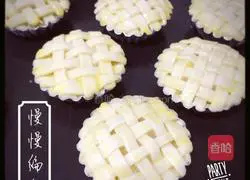
7.For the dough with a ratio of 1, use a rolling pin to roll it into a thin sheet, cut it into small strips, fill it up evenly vertically, then put a strip in the middle and start braiding.

8. Brush the epidermis with whole egg liquid.
9. Preheat the oven to 170 degrees and bake for 30 minutes until the skin is golden.Every oven is different, so adjust accordingly.

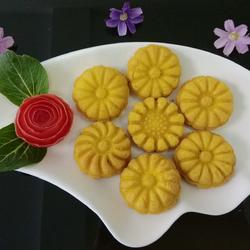
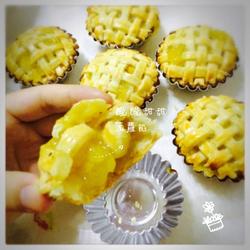
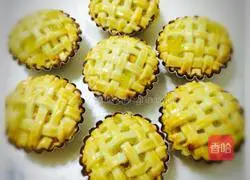
10.Finished product picture
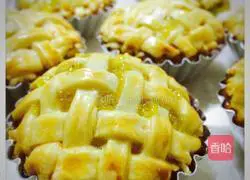 11.Finished product picture
Copyright Statement:This article is a reprinted article, and the copyright belongs to the original author. Please retain the source when reprinting!