Health benefits
Eggs: protect eyes and improve eyesight
Ingredients
Chiffon cake mix ( 80g ) | Milk ( 50 grams ) |
Eggs ( 5 ) | Corn oil ( 40g ) |
Sugar ( 30 grams (egg yolk liquid) ) | Sugar ( 60 grams (protein liquid) ) |
Lemon juice ( One spoon (about 5 grams) ) |
Chiffon cake--eight-inch recipe
1. Prepare two water-free and oil-free containers, and put the separated egg yolks and egg whites respectively.(I separated it with a separator)

2.Protein
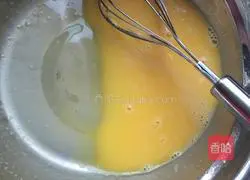
3. Add sugar (30g), corn oil (40g), Mix milk (50g) evenly with a hand mixer until completely combined.Add cake flour (80g) and stir gently (drip gently)

4.Add sugar (30 grams) and lemon juice (one spoonful) to the protein liquid and beat with an electric egg beater until the following state
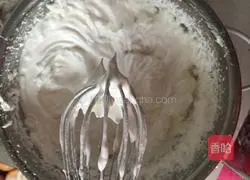
5.Continue to add sugar (30 grams) and beat with an electric egg beater until the following state (it must be that when you lift the egg beater, the egg liquid carried on the top becomes upright.Otherwise There is not enough time to bake, please be patient.

6. Divide one-third of the protein into Once mixed into the egg yolk (to ensure even mixing), stir it up and down like stir-fry

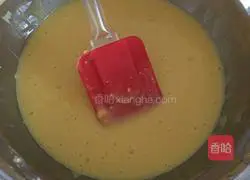
7.Continue to add the remaining egg whites and stir evenly until a light yellow paste is obtained, as shown in the picture

8.Pour the egg batter into an eight-inch removable bottom mold, hold both sides with your hands, and vibrate it up and down (I just throw it flatly on the table) to eliminate air bubbles.
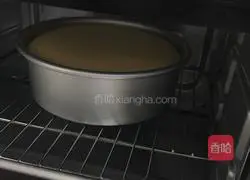
9. Preheat the oven to 150 degrees for 5 minutes and put the mold on the grill , I have a Midea three-layer oven, placed on the bottom floor.Bake at 145 degrees for 1 hour and 10 minutes.

10. Take out the mold and drop it freely 40 cm away from the table (it can also be two to Three times, for easy demoulding)

11.After completing the previous step, immediately Place the mold upside down on the grill.Cool thoroughly (must be cool enough, be patient, the last step is very important)

12.After it cools down, gently push the bottom of the mold with your hands to take out the cake (you can control the strength yourself) and then use a knife to separate the bottom of the mold from the cake (just make a cut along the edge).Your cake is ready to eat
Copyright Statement:This article is a reprinted article, and the copyright belongs to the original author. Please retain the source when reprinting!